Scape is the name of a proof-of-concept terrain editor I developed as part of my thesis work at W!Games in 2008. The terrain editor allows the user to sculpt large terrains using procedural brushes in real-time. Under the hood, the GPU is not only used to render the heightfield terrain, but also to execute the heightfield manipulations, resulting in major speedups over CPU-based approaches.

This article is the first of a series and covers the techniques used in Scape to render the edited terrain. The second and third article discuss procedural algorithms implemented as pixel shaders, used in Scape’s GPU terrain editing pipeline. The fourth covers the editing pipeline itself. The fifth one provides a summary of the project, together with all links to the project’s research, articles, source code and binaries. All Scape articles are based on my thesis work that can be downloaded freely at the bottom of this page as well.
Scape was designed around mid-spec hardware a few years back, before OpenCL and CUDA hardware support was commonplace. So, for today’s standards, the minimum specs are quite modest: the Windows binary should easily run on all common Shader Model 3.0 hardware, with 256 MB of video memory and up. Scape was written in Microsoft Visual C++ on top of the great open-source cross-platform Ogre 1.4.6 graphics engine and the wxWidgets 2.8.3 GUI framework.
The original source code will be made available as BSD-style open source, as soon as I get around to it (which will probably be a month or two from now). Please note that neither I nor Vanguard Games currently have any intention to support or extend the Scape project, and it will come without any guarantees, so please accept it as is. But, back to rendering terrain…
Rendering terrain geometry
Scape imposes no hard limits to the terrain size (other than requiring it to fit in virtual memory), supporting terrains consisting of tens of millions of height samples. Naively trying to render each sample in a very large terrain as a triangle/quad vertex would lead to rendering a lot of distant sub-pixel triangles, wasting valuable GPU cycles. Hence, a discrete tile-based level of detail (LOD) system was implemented, similar to GeoMipMapping.
-


- Without LOD system

-

- With distance-dependent LOD

That way, tiles farther away from the camera are rendered with less fidelity, while tiles closer by are rendered in full geometric detail, causing a roughly constant vertex density as seen from the camera’s perspective.
Each single tile is responsible for rendering a square patch consisting of a fixed number of height samples. Experiments showed that 192 x 192 samples per tile performed optimally on the target hardware (a modest Intel Core 2 Duo 2.0 GHZ / NVIDIA 7950GTM 512MB system).
To minimize the renderer’s memory footprint, and to improve cache coherency, terrain preprocessing/update speed and thus overall editor performance, the triangle vertex and index data for each tile is organized and optimized to allow as much data to be static and shared between tiles as possible.
To render a tile, a number of pieces of information need to come together. In Scape, triangle information is spread over three different GPU data streams: XZ vertex buffers, Y vertex buffers and index buffers. Together with a transform matrix, this is fed to a custom vertex shader responsible for decoding and combining this information into 3d triangle vertex positions.

A XZ vertex buffer defines the local (horizontal) X and Z component of the (triangle) vertices for a single tile, relative to one of its corners. A per-tile transform matrix is used in the terrain vertex shader to transform these local space components into world space. The advantage of defining this vertex buffer in local space is that the XZ vertex buffers can be shared between all tiles with equal LOD level, independent from height information and neighboring tiles.
A Y vertex buffer defines the (vertical) Y components of a tile’s vertices. The information contained in this buffer is typically unique per tile. The Y vertex buffer is updated when a tile’s LOD level changes, and (unlike the other two data streams) when the terrain is actually edited.
Lastly, an index buffer defines the topology of the tile as a single triangle strip, using degenerate triangles as glue between left-to-right triangle spans. The regularity and the independency from height information allows index buffers to be static and shared between tiles. Only when the LOD of a tile or its neighbors changes due to camera movement, a new shared index buffer is associated. Here’s why:

GeoMipMapping: rendering a 50x50 heightfield using 16x16 tiles. Camera at bottom left.
A tile that is next to a tile with a coarser LOD will use a triangle topology (i.e. an index buffer) that will skip over vertices on the tile’s edge defined in the XZ and Y vertex buffer in a regular fashion (see the GeoMipMapping image above). That way, T-junction issues can be prevented completely without having to resort to ‘skirts’, for example. By careful construction of a fixed set of index buffers for all possible LODs and neighboring LODs combinations, this will work without ever requiring updates to the XZ and Y vertex buffer when a tile’s neighboring tile changes.
The terrain renderer doesn’t use continuous vertex warping between tile LODs for performance reasons. Consequently, a slight pop can be noticed when a tile’s LOD changes in the distance. But the amount of popping can be minimized to any level by biasing a global LOD parameter towards finer detail, obviously at the cost of requiring extra processing power to render the terrain.
Shading the geometry
There’s no standard way to light and texture terrain, so any stand-alone editor can only approximate the final result of how it would like in an engine of choice once exported. And as Scape’s main goal was to enable users to easily define the terrain geometry, but not per se to define the shading of it, it was decided that all texturing was to be done procedurally.
-


- Lighting without texturing
-

- Height dependent weights
-

- Height, slope and noise dependent weights
The terrain is textured using four stacked layers of user-selected tiling textures. The weights of these textures is determined per pixel in the pixel shader using height and slope data from the vertex shader, and can be influenced by a large number of pixel shader constants derived from many user-controlled parameters. This makes it possible to globally control height and slope ranges for the different textures (disallowing snow on very steep slopes, for example), as well as define how the transition areas should look. For example, a spread can be defined to soften the range constraints and thus smooth the transition area (to smoothly go from lush grass and dry grass at some point, for example).
Furthermore, the weight-controlling height and slope ranges can be randomly biased using a user-controllable noise texture, causing transitions between layers to become more noise-dithered (to create snow patches in transition areas instead, for example) than smoothly ‘alpha blended’.
Note that because the above is all done in the pixel shader per frame in real time, the texturing will update instantly when the terrain is edited, or when the shading parameters are changed. To light/shade the texturing, only two non-shadowcasting lights are used in the editor for performace reasons: one directional sun light and one hemispherical sky light. Although this lighting setup might be too limited for high-end games these days, this proved to be more than sufficient for a terrain editor, where iteration speeds typically would matter more than accurate shadowing.
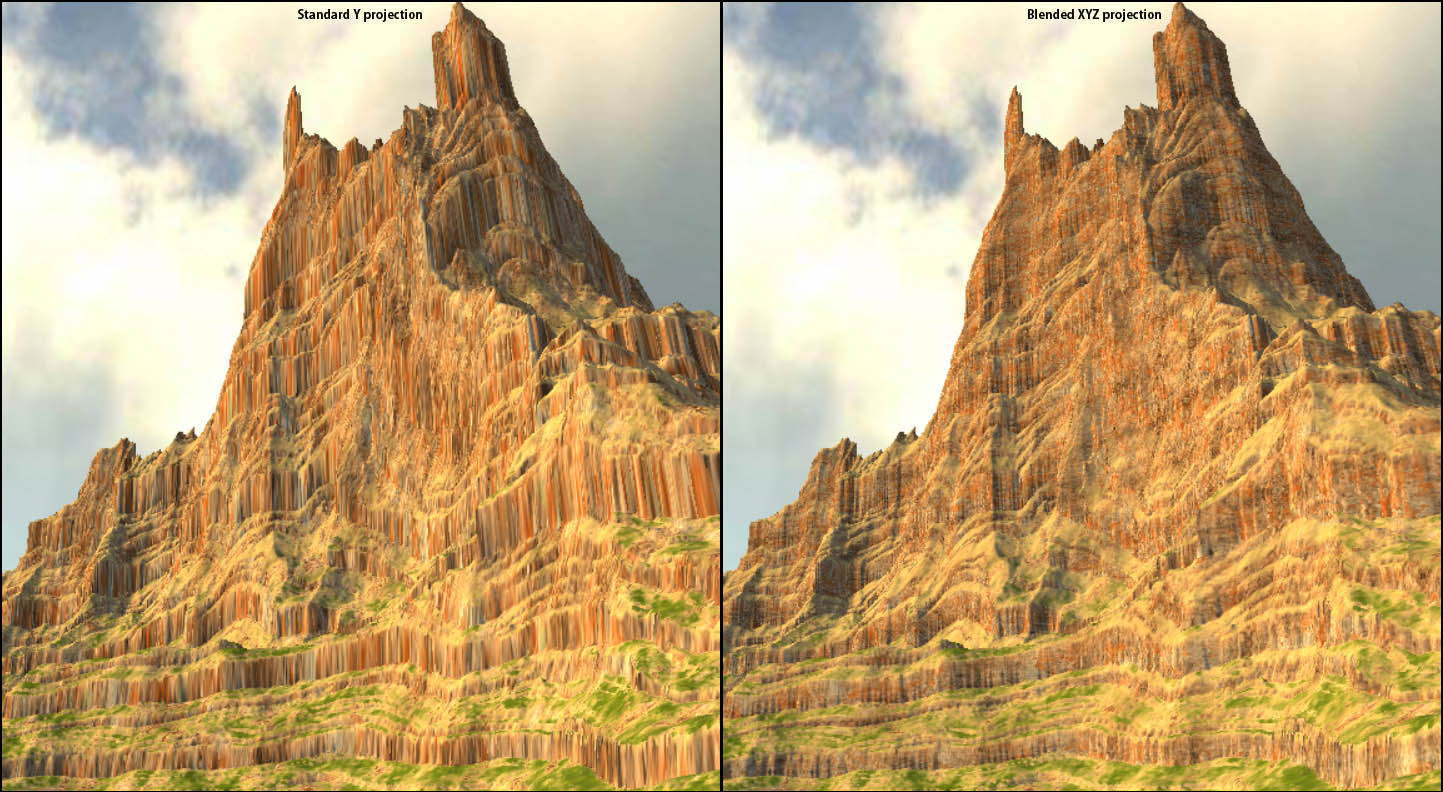
Projecting textures onto heightfields

Only projecting vertically
Heightfields allow for a basic 2D texture mapping strategy: Repeated tiling textures can simply be projected vertically onto the XZ plane. In other words, the vertices’ XZ values can simply be interpreted as (scaled) texture UVs. This basic projection works well for flat land and even hills, but causes noticeable stretching on very steep and rough terrain.

Projecting along 3 directions
For steeper features, a projection along a more perpendicular (and thus horizontal) direction is more desirable. Hence, a more complex projection strategy was also implemented: Instead of only projecting the textures vertically, they are also projected along the X and Z axis. The outputs of the three sampled projected textures are blended based on the pixel’s normal direction. That way, flat areas will continue to use the vertical projection, while steeper areas blend in results from more horizontal projections. The technique’s advantages are especially noticable on steep terrain features, as shown here. In a pixel shader, this can simply be implemented as:
float3 uvwPos = uvwScaleFactor * worldPosition;
float3 weights = worldNormal * worldNormal;
float3 blendedColor = weights.xxx * tex2D(texSampler, uvwPos.yz).rgb +
                      weights.yyy * tex2D(texSampler, uvwPos.zx).rgb +
                      weights.zzz * tex2D(texSampler, uvwPos.xy).rgb;
When enabled, the above is executed four times in this implementation’s pixel shader: once for each of the four texture layers. Note that the three weights will always add up to exactly 1.0 for normal vectors (assuming they are properly normalized), as x2 + y2 + z2 = 1.0, so no additional weight normalization is needed. Furthermore, when compared to powers other than 2, using the square of the normal components as weights also strikes a pleasing balance between preventing unnecessary blending and offering smooth transitions between projection directions.
EDIT: It was brought to my attention that around the same time I came up with this solution, a similar (but probably slightly slower) technique was described and published in GPU Gems 3. A quantified comparison between the results of these techniques can be found here.
Scape demo
The following real-time clip demonstrates how Scape can be used to create a detailed heightfield in real time using a number (GPU-based) brushes, while rapidly displaying all changes in geometry and texturing using the techniques described above.
Downloads
- Interactively synthesizing and editing virtual outdoor terrain (PDF).
Extensive survey on modern terrain editor requirements, procedural terrain algorithms, ‘terrain’ texture synthesis, terrain editing tools, terrain texturing and foliage placement. - Effective GPU-based synthesis and editing of realistic heightfields (PDF) (PPT).
MSc. thesis on brush-based editing of heightfield, researching the application of common and novel procedural algorithms as GPU-based brushes to offer users both better control and iteration speeds.
December 6, 2013